Fermented Foods Recipes
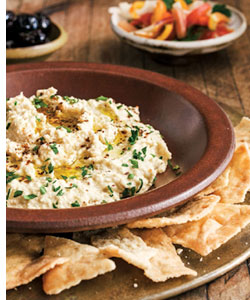
Sprouted Chickpea Hummus Recipe
Yield: 4 cups
Start to Finish: 30 minutes
Hummus is a versatile, delicious Mediterranean condiment.
This version features a combination of sprouted
and cooked chickpeas to get a bit of fermentation
started. You can make this hummus chunky or smooth,
or add fresh, peeled fava beans with the chickpeas. For
a smoky flavor, add a bit of smoked paprika or drizzle
with some smoked olive oil (see Resources, page 241).
Click here for recipe

- 1 cup sprouted chickpeas (see page 7)
- 11⁄4 cups cooked chickpeas
- 1 cup tahini paste
- 6 large cloves Fermented Garlic (page 75)
- 1 to 11⁄2 teaspoons unrefined fine sea salt
- 1⁄4 teaspoon Aleppo pepper or cayenne pepper
- 1⁄2 teaspoon cumin seed, toasted
- Juice of 1 to 2 lemons
- 2 tablespoons Basic Brine (page 13)
- 1⁄3 cup extra-virgin olive oil (peppery flavor preferable)
Directions
In a food processor, combine the chickpeas, tahini,
and garlic, and pulse to a chunky consistency. Add the
salt, pepper, and cumin and blend. Add the juice of
1 lemon and the brine, combine, and taste. With the
food processor running, drizzle in the olive oil. Taste
again and add more lemon juice if desired or add a few
drops of water to thin, if necessary. Adjust salt and
pepper and adjust lemon again to taste. Place in a jar,
cover, and refrigerate. Hummus will keep for 3 weeks
or longer.
Close.
Sweet Tomato-Jalapeño Salsa Recipe
Yield: About 3 cups
Start to Finish: 20 minutes to make + 8 to 12 hours
fermenting + 12 hours refrigeration
The bright colors and flavors of salsa are great complements
to grilled and slow-roasted foods. This one partners
well with pork and fish. Due to the sweetness of the
fruit, this salsa is fermented for a short period and then
moved to refrigeration. Taste a tiny bit of a jalapeño
before you begin to prep. If too hot, add more honey
and more mangoes to this recipe, or reduce the number
of jalapeños you use. You can also toss in more cut
tomatoes and chopped cilantro just before serving to
add a bit more bright color and fresh flavor. Serve with
Grilled Buttermilk–Black Bean Flatbread (page 124). See
photo on page 218.
Click here for recipe
- 2 cups red or mixed cherry tomatoes, halved
- 3 small or 2 large jalapeño chiles, stemmed, seeded, and
chopped (option: fermented, seeded, and chopped)
- 3 cloves garlic, thinly sliced
- 1⁄2 cup chopped fresh mango
- 1 tablespoon minced or finely grated fresh ginger
- 1 teaspoon cumin seed, toasted
- 1⁄2 teaspoon coriander seed, toasted and crushed
- 1⁄4 teaspoon ground white pepper
- 1⁄2 teaspoon unrefined fine sea salt
- 2 tablespoons raw, unfiltered apple cider vinegar
- 1⁄4 cup raw, unfiltered orange blossom honey
- 1 teaspoon grated lime zest
- Juice of 1 lime
- 2 tablespoons fermenting agent (basic whey, water
kefir, or brine from fermented vegetables like
jalapeño chiles)
- 1 sprig fresh cilantro, for the jar (optional)
Directions
Gently combine the tomatoes, chiles, garlic, mango,
ginger, cumin, coriander, white pepper, and salt in
a bowl. Combine the vinegar, honey, lime zest, and
lime juice and stir into the mixture. Stir in the fermenting
agent last. Place in a jar or crock and push
down slightly to remove any air pockets. Secure the
opening with cheesecloth. Ferment at room temperature
for 8 hours or overnight. Add the sprig of cilantro
just before refrigerating. Cover with an airtight
lid and refrigerate overnight for the flavors to come
together. This salsa will keep for up to 2 weeks.
Bonus Recipe
This salsa creates some lovely juice. You can drain
it a bit before serving and drizzle the juice on grilled
fish or shellfish, use it to make ceviche, whisk in some
fruity olive oil to create a vinaigrette, or reduce it to
make a syrup to add to cocktails or fizzy beverages.
Close.
Basic Fresh Goat Chèvre
Yield: 1 1⁄2 pounds
Start to Finish: 30 minutes cheese making + 12 hours ripening + 6 to 12 hours draining
Chèvre is the common name for spreadable goat
cheese. It often has dried herbs or spices blended
into or coating it. This version uses a premixed,
premeasured blend of culture and rennet designed for
making chèvre: C20G. This is the simplest method for
any novice cheese maker and is a great entry point into
making cultured cheeses.
Click here for recipe
- 1 gallon pasteurized goat milk, at room temperature for 1 hour
- 1 packet C20G direct-set mesophilic starter culture
- 1 teaspoon unrefined fine sea salt
Directions
- In a nonreactive stockpot, gently heat the milk
over low heat to 86°F. This should take 25 to 30 minutes.
Turn off the heat.
- Sprinkle the starter over the milk and let it
rehydrate for 5 minutes. Whisk the starter into the
milk, using an up-and-down motion to distribute
thoroughly.
- Cover and maintain a temperature of no lower
than 72°F, allowing the milk to ripen for 12 hours.
Wrap with a terry towel to keep warm. (Either ripen
during the day to drain at night or ripen overnight to
drain the next morning.)
- The curds are ready when they have formed one
large, solid mass in the pot with the consistency of
thick yogurt, surrounded by clear whey.
- Place a strainer over a bowl or plastic bucket large
enough to capture the whey. Line the strainer with a
single layer of dampened butter muslin or cheesecloth,
leaving excess cloth hanging over the sides of the
strainer. Gently ladle the curds into it. After draining
for 5 minutes, gently toss the curds with the salt. Tie
the corners of the cloth together to create a draining
sack, slip a wooden spoon handle through the knot,
and hang over a deep cooking pot or bucket to drain
at room temperature (68°F to 72°F) for 6 to 12 hours
(see Option). The longer the curds drain, the drier the
finished cheese will be.
- Remove the cheese from the cheesecloth or molds
and store refrigerated in a covered container for up to
1 week.
Option: Rather than gravity draining in bulk in a
sack, you can fill four chèvre molds that sit on a draining
rack to drain for the same amount of time. Flip the
curds once during the draining process.
Tip: If you want a soft, creamy consistency, drain for
6 or so hours. If you want to create a log of chèvre, let
the curds drain for up to 12 hours so the cheese can be
formed more easily and hold the desired shape. When
adding dried herbs, mix in after salting and draining
for 5 hours, and then continue to drain until the
desired consistency is achieved.
Close.
Ginger-Mint Shrub
Yield: About 1 1⁄2 cups
Start to F inish: 10 minutes preparation + 12 hours fermenting + 1 week at room temperature + 1 week refrigeration
Shrubs date back to colonial America. Use these amazing
sweet-sour syrups to make cocktails, sodas, and to
flavor Water Kefir (page 171), or even Kombucha (page
177)! They also make great vinaigrettes.
Click here for recipe

- 1⁄2 cup thinly sliced fresh ginger
- 1⁄2 cup packed fresh mint leaves
- 3⁄4 cup raw, unfiltered apple cider vinegar
- 1⁄2 cup freshly squeezed lime juice
- 1⁄2 cup raw unrefined cane sugar
Directions
- Place the ginger and mint leaves in a glass jar;
bruise them to release some of the juices. Add the
vinegar, close the jar tightly, and shake vigorously for
10 seconds. Replace the lid with cheesecloth. Securely
attach a layer of cheesecloth over the opening and
leave at room temperature for 12 hours or overnight.
- Replace the cheesecloth with the lid, secure tightly,
and repeat the vigorous shaking daily for 1 week.
Strain out the ginger and mint and stir in the lime juice
and sugar until dissolved. Bottle, add a sprig of mint,
close tightly, and shake vigorously for 10 seconds.
Refrigerate for 7 days before using. Give the bottle a
vigorous shake every day for that week. Refrigerate
after opening. Syrup will last for up to 4 months.
Close.
Pineapple Vinegar Marinade on Bean Salad
I’ve used this marinade for shrimp on the grill, roasted chicken and pork tenderloin and I can’t pick a favorite.
Click here for recipe
- 2 cloves garlic, peeled and smashed
- 1 tablespoon Mexican oregano
- 1 teaspoon salt
- 1 scant teaspoon ground cumin
- 1 cup olive oil
- 1/2 cup pineapple vinegar (recipe pages 33-34)
In a mortar, pound the garlic with the salt and spices. When smooth, add the oil and vinegar, gently whisking until incorporated.
Black Bean Salad
Be sure and make your beans from scratch. Canned beans need to be rinsed as the liquid they are stored in gets funky after all that time in a can.
This recipe calls for drained beans, so save that bean liquid and use it in soups or to poach an egg.
I think the key to good bean salads is having lots of crunchy things to go with the creamy beans. I think an acidic dressing is also a great contrast to the mild, creamy legumes.
Try and dress the beans while they are still a little warm so they can really absorb the liquids.
- 1 1/2 cups cooked black beans
- 1/2 red onion, sliced into super thin rings
- 1 bunch of radishes, cleaned and then sliced into thin slivers
- 1 stalk celery, chopped
- Pineapple Vinegar Marinade, to taste
Steve Sando © 2012 | Rancho Gordo Beans
Close.
Water-Cured Green Olives
Click here for recipe
To encourage the curing process using this method, olives are often ‘cracked’ with a rolling pin or wooden mallet to break open the skin slightly.
You are not trying to break the flesh away from the pit. An alternative is to cut a small slice in the side of the olive. Place rinsed and drained
olives in a food-grade container.
Cover with cool filtered water and place a weight on top to keep the olives completely submerged.
Cover with fine cheesecloth, and store in a cool dark location. Drain and change the water daily. As the olives soak, their bitterness is being removed. Begin to
taste sample after 6 weeks for bitterness. Based on your taste, you can continue to soak for another week or until they taste good to you. In this
last week, sample taste daily. When they taste good to you, you can finish the olives using the method described in Brine-Cured Olives.
Close.


